
Self Sealing Clamp On Adapter Installation Guide
For Continental Engines
Installation Procedure for Self Sealing Clamp On Adapter, Continental C-65, C-85, C-90, & O-200
On some of the lower horsepower engines, there may be no accessory case or plug, which can be removed and replaced with a hose fitting. In this case there are two possible solutions. The first, which is the most labor intense, would be to remove the #1 cylinder rocker cover, drill a hole and weld fittings in place as described in the Installation Guidelines for the RMJ-AERO oil separators. The alternate method is the use of the RMJ-AERO Self Sealing Clamp On Adapter. The only requirement for this installation, is drilling a 1/4" hole in the oil sump filler neck. The stainless steel clamp provides a return port connection to the oil sump using a single bolt for attachment and sealing. The silicone cushion material is oil and fuel resistant and rated for -120° F to +450° F temperatures.
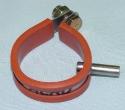
C103 Self Sealing Clamp On Adapter for Continentals
|
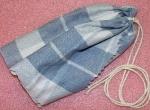
Plugging Rag & String
|
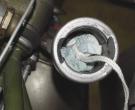
Plugging Rag Inserted In Oil Sump Filler Neck
|
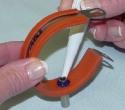
Apply RTV Sealant To Inside of Adapter
|
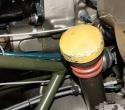
Completed Installation Of Adapter On O-200A
|
|
Click on any picture to see a close-up.
|
- Read all instructions before beginning installation. These instructions assume your engine is assembled and is full of oil. If your engine is apart or the oil sump is off the engine, you will not need to seal the filler neck as in Steps No. 5 & 6.
- Note: Your separator must be mounted as high as practical in the engine compartment and in a position which is easy to connect to the engine breather line.
- Determine the location on the oil sump filler neck, which will provide downward slope drainage from the oil separator return line. You must take into consideration the connection at the adapter, as it will require a small hose clamp, and access space needed. There must be NO interference with any other engine plumbing or controls.
- Once the position has been determined on the filler neck, use a center punch to mark the location for drilling the 1/4" diameter hole. (DO NOT DRILL THE HOLE YET!)
- Prepare a lint free rag, about half the size of a washrag, by tying a length of nylon string in the middle of it (see photo above). The rag must be large enough to fit snugly down the inside of the filler neck, but not so snug as to be hard to pull out with the attached string. Prepare the rag for insertion into the filler neck by applying bearing grease over the outside of it.
- Remove the filler cap & dipstick assembly and set aside. Insert the greased rag down the filler neck holding on to the string and leaving the ends hanging out of the filler neck tube. Push the rag down just below the point where you will be drilling the 1/4" hole. This will prevent any chips from falling into the oil sump.
- Drill the 1/4" hole thru the filler neck wall in the location marked. Most of the drilling chips will fall on the outside of the filler neck until the drill finally penetrates. At that point there may be a few small chips that find their way into the filler tube, but the greased rag will prevent them from going into the oil sump.
- After drilling the hole, inspect the inside of the filler neck tube for any burrs that may still be attached to the tube. Remove them with a small rattail file. After removing any burrs, use a magnet on a stick or small screwdriver with a magnet in the end to collect any of the large or loose chips and shavings that might be in the filler neck.
- Fit up the Clamp On Adapter with the filler neck tube and make sure the hole drilled is large enough to accept the 1/4" diameter tube projecting from inside the Adapter. If the hole is too small for the tube to go into, enlarge the hole as required, but not too large. Remove any additional chips if present from redrilling the initial hole after fit-up of the Adapter.
- Once you have removed as many chips as possible with a magnet and trial fit up the Adapter, carefully pull the greased rag out of the filler neck with the strings that were tied to it. As you pull, the grease on the rag will collect any remaining chips or shavings. They will stick in the grease preventing them from falling into the oil sump.
- THE HARD PART IS DONE!
- Thoroughly clean the outside of the filler neck tube in the area of the drilled hole with solvent, that will remove oily deposits. Apply a "small" bead of Permatex Silicone Gasket Maker, Ultra Blue No-Leak RTV Silicone around the outside of the tube projection and on the silicone cushion of the clamp (see photo above). Note: Ultra Blue is much more oil resistant than ordinary silicones. Ultra Blue offers excellent adhesion to oily surfaces. Contact with oil increases flexibility and seal. It is non-corrosive and has a low volatility. Temperature range is -95° F to +400° F.
- Now install the Clamp On Adapter by inserting the 1/4" projecting tube into the hole drilled in the filler neck. Hold in position and secure with the AN bolt, washer, and nut supplied. Your oil return port is now ready for connection to your oil separator.
- Connect the separator drain to the Clamp On Adapter port using oil resistant tubing. We recommend silicone tubing, which can handle elevated temperatures. Remember this is not a pressurized line. It is very near atmospheric pressure during operation. If you cannot find silicone tubing locally, contact RMJ-AERO. We stock 1/4" tubing and can cut any length required. (Current prices can be found on the Prices & Warranty page.) Use Aero-Seal and or Breeze Miniature hose clamps for installing all separator hose connections.
RMJ-AERO Pages
[RMJ-AERO Main Page]
[Oil Separator]
[Custom Fabrication Services]
[General Installation Guide]
[Separator Maintenance]
[Aerobatic Elbow]
[Continental Installation Guide]
[Continental Clamp On Adapter Installation Guide]
[Lycoming Installation Guide]
[Lycoming Clamp On Adapter Installation Guide]
[Prices & Warranty]
[RMJ-AERO Gallery]
RMJ-AERO
Aviation Products for the Homebuilder
402 Tyrone Drive
Forsyth, IL 62535
E-Mail:
info@rmjaero.com
|

Join & Support The EAA And Your Local EAA Chapter
God Bless The USA
|


